Water Works Wonders: Choosing and Managing Your Hydroponic Reservoir
Water Works Wonders: Choosing and Managing Your Hydroponic Reservoir - TLDR
This guide provides essential information on selecting, maintaining, and troubleshooting hydroponic reservoirs, covering aspects like size, material, water temperature, algae prevention, nutrient solution changes, and water quality for successful plant growth.
- Choose a reservoir of appropriate size (1-2 gallons/large plant, 0.5-1 gallon/small plant) made from food-grade, opaque material to prevent algae and ensure durability and accessibility.
- Maintain water temperature between 65-75°F (18-24°C) to optimize nutrient availability, oxygen levels, and root health, using methods like chillers, heaters, or insulation.
- Prevent algae growth by blocking light, regularly cleaning the reservoir, and considering beneficial bacteria, hydrogen peroxide, or UV sterilizers.
- Change the nutrient solution every 1-2 weeks, or when EC/TDS drops significantly, pH becomes unstable, or the solution appears cloudy or discolored.
- Test water quality for impurities like chlorine, high TDS, or hardness, and improve it using methods such as reverse osmosis (RO) filtration or dechlorination to ensure optimal plant health.

So, you're diving into the world of hydroponics? Awesome! You're about to discover a super-efficient way to grow plants without soil. One of the most crucial components of any hydroponic system is the reservoir. Think of it as the heart of your operation, holding the lifeblood (nutrient solution) that keeps your plants thriving. Choosing the right reservoir and managing it properly can be the difference between a bountiful harvest and a disappointing flop. Let's get into the nitty-gritty!
Selecting the Right Size and Type of Reservoir
First things first: size matters! The size of your reservoir depends on several factors, including:
-
The size and number of your plants: Obviously, more plants and larger plants need more water. A good rule of thumb is to have at least 1-2 gallons of reservoir capacity per large plant (like tomatoes or peppers) and about 0.5-1 gallon per smaller plant (like lettuce or herbs).
-
The type of hydroponic system: Deep water culture (DWC) systems generally require larger reservoirs than nutrient film technique (NFT) systems. DWC plants have their roots constantly submerged, so you need enough solution to cover them. NFT systems rely on a thin film of nutrient solution, so the reservoir can be smaller.
-
The frequency of reservoir refills: If you're not around to check and refill the reservoir every day, you'll need a larger one to provide a buffer.
Estimating Reservoir Size:
Let's say you're growing six tomato plants in a DWC system. Using our rule of thumb, you'd need at least 6-12 gallons of reservoir capacity. It's always better to err on the side of caution and go a bit bigger. A 15-20 gallon reservoir would be a good choice in this scenario.
For a smaller NFT system with, say, 12 lettuce plants, you could get away with a 6-12 gallon reservoir. Remember, you can always top it off!
Types of Reservoirs:
Now that you have a rough idea of the size you need, let's talk about the different types of reservoirs you can use:
-
Plastic Buckets/Totes: These are the most common and affordable options. Food-grade plastic is a must to avoid leaching harmful chemicals into your nutrient solution. Look for opaque containers to prevent light from reaching the solution and promoting algae growth (more on that later!).
-
Commercial Hydroponic Reservoirs: These are specifically designed for hydroponics and often come with features like pre-drilled holes for plumbing, level indicators, and access ports. They can be more expensive but offer convenience and durability.
-
DIY Reservoirs: You can get creative and build your own reservoir using materials like plastic sheeting and a frame. This is a good option if you need a custom size or shape. Just make sure all materials are food-grade and waterproof.
Considerations for Choosing a Reservoir:
-
Material: As mentioned, food-grade plastic is essential. Avoid using containers that have been used for chemicals or other potentially harmful substances.
-
Opacity: Opaque containers block light and prevent algae growth. If you're using a translucent container, you can wrap it with black tape or paint it to block the light.
-
Durability: Choose a reservoir made from sturdy material that can withstand the weight of the nutrient solution and any accidental bumps or knocks.
-
Access: Make sure you can easily access the reservoir to check the water level, pH, and nutrient concentration. A wide opening or access port is helpful.
-
Shape: The shape of the reservoir doesn't matter too much, but rectangular or square containers are generally easier to work with than round ones.
Example Scenario:
Let's say you want to grow strawberries in a Kratky system (a passive hydroponic method where the plant's roots dangle in a non-aerated nutrient solution). Since strawberries are relatively small plants, you could use individual 5-gallon buckets as reservoirs for each plant. The opaque plastic will prevent algae growth, and the large opening makes it easy to check the water level.
Key Takeaway: Choose a reservoir that's the right size for your plants and system, made from food-grade, opaque material, and easy to access.
Maintaining Water Temperature for Optimal Growth

Water temperature is a critical factor in hydroponics. It affects nutrient availability, oxygen levels, and root health. Plants generally thrive in a temperature range of 65-75°F (18-24°C).
Why is Temperature Important?
-
Nutrient Availability: Water temperature affects how well nutrients dissolve in the water and how easily plants can absorb them. Too cold, and nutrients may not dissolve properly. Too warm, and the water may not hold enough dissolved oxygen for the roots to function optimally.
-
Oxygen Levels: Warm water holds less dissolved oxygen than cold water. Plant roots need oxygen to breathe, just like we do. Low oxygen levels can lead to root rot and other problems.
-
Root Health: Extreme temperatures can damage plant roots. High temperatures can encourage the growth of harmful bacteria and fungi, while low temperatures can stunt root growth.
Monitoring Water Temperature:
The easiest way to monitor water temperature is with a submersible thermometer. You can find these at most hydroponic supply stores or online. Check the temperature regularly, especially during hot or cold weather.
Methods for Controlling Water Temperature:
-
Location, Location, Location: Place your reservoir in a location where the ambient temperature is relatively stable. Avoid direct sunlight, which can heat up the water quickly.
-
Water Chillers: These are the most effective way to cool down the water in your reservoir. They work like mini-refrigerators, circulating the water through a cooling unit. Water chillers can be expensive, but they're worth the investment if you live in a hot climate.
-
Aquarium Heaters: These are used to warm up the water in your reservoir. They're a good option if you live in a cold climate or if your grow space is poorly insulated.
-
Insulation: Insulating your reservoir can help to maintain a more stable temperature. You can use materials like bubble wrap, foam insulation, or even an old blanket.
-
Evaporation: Evaporation can help to cool down the water in your reservoir. You can increase evaporation by adding an air stone to the reservoir or by placing a fan near the reservoir. However, be mindful of increasing humidity in your grow area, which can create other problems.
-
Water Changes: Regularly changing the water in your reservoir can help to keep the temperature stable. Use water that is close to the desired temperature.
Example Scenario:
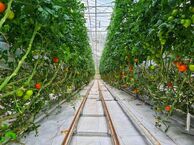
You're growing peppers in a greenhouse during the summer. The ambient temperature inside the greenhouse often exceeds 90°F (32°C), causing the water temperature in your reservoir to rise above 80°F (27°C). This is too warm for optimal growth and increases the risk of root rot.
To combat this, you could use a combination of methods:
- Shade Cloth: Install shade cloth over the greenhouse to reduce the amount of direct sunlight.
- Water Chiller: Invest in a small water chiller to cool the nutrient solution.
- Insulation: Wrap the reservoir with insulation to help maintain a cooler temperature.
Key Takeaway: Monitor your water temperature regularly and take steps to maintain it within the optimal range of 65-75°F (18-24°C) using appropriate methods.
Preventing Algae Growth and Other Reservoir Issues

Algae is the bane of many hydroponic growers. It's unsightly, competes with your plants for nutrients, and can clog your system. Fortunately, there are several things you can do to prevent algae growth in your reservoir.
Why is Algae a Problem?
-
Nutrient Competition: Algae consume nutrients that your plants need to thrive. This can lead to nutrient deficiencies and stunted growth.
-
Clogging: Algae can clog pumps, tubing, and other components of your hydroponic system, reducing its efficiency and potentially causing damage.
-
pH Imbalance: Algae can affect the pH of your nutrient solution, making it difficult for your plants to absorb nutrients.
-
Aesthetic Issues: Algae is simply unattractive and can make your hydroponic system look dirty and unkempt.
Preventing Algae Growth:
-
Block the Light: As mentioned earlier, algae need light to grow. Use an opaque reservoir to prevent light from reaching the nutrient solution. If you're using a translucent container, wrap it with black tape or paint it.
-
Keep it Clean: Regularly clean your reservoir and other components of your hydroponic system to remove any algae spores or other contaminants.
-
Beneficial Bacteria: Add beneficial bacteria to your nutrient solution. These bacteria compete with algae for nutrients and can help to keep it under control.
-
Hydrogen Peroxide (H2O2): Hydrogen peroxide is a powerful oxidizer that can kill algae and other microorganisms. Use it sparingly, as it can also harm beneficial bacteria. A common dosage is 1-2 ml of 3% hydrogen peroxide per gallon of nutrient solution.
-
UV Sterilizers: UV sterilizers use ultraviolet light to kill algae and other microorganisms in the water. They're a more expensive option but can be very effective.
-
Algaecides: Algaecides are chemicals specifically designed to kill algae. Use them as a last resort, as they can also harm your plants.
Other Reservoir Issues:
Besides algae, other common reservoir issues include:
-
pH Fluctuations: The pH of your nutrient solution can fluctuate due to various factors, including nutrient uptake by plants, algae growth, and the addition of tap water. Monitor the pH regularly and adjust it as needed using pH up or pH down solutions.
-
Nutrient Imbalances: Over time, the nutrient balance in your reservoir can become skewed as plants selectively absorb certain nutrients. Regularly change your nutrient solution to maintain a balanced nutrient profile.
-
Root Rot: Root rot is a fungal disease that can affect plant roots in hydroponic systems. It's often caused by poor aeration, high temperatures, and the presence of pathogens. Prevent root rot by maintaining good aeration, controlling water temperature, and using beneficial bacteria.
-
Salt Buildup: Over time, salts from the nutrient solution can accumulate in the reservoir and on plant roots. This can lead to nutrient lockout and other problems. Regularly flush your system with fresh water to remove excess salts.
Example Scenario:
You notice a green film growing on the sides of your reservoir and in your hydroponic system's tubing. This is algae!
Here's how you might address the problem:
- Clean the Reservoir: Thoroughly clean the reservoir and tubing with a mild bleach solution (1 part bleach to 10 parts water). Rinse thoroughly before refilling.
- Block the Light: Ensure your reservoir is opaque or wrap it with black tape.
- Add Beneficial Bacteria: Introduce beneficial bacteria to your nutrient solution.
- Monitor pH: Check the pH of your nutrient solution regularly and adjust as needed.
Key Takeaway: Prevent algae growth by blocking light, keeping your system clean, and using beneficial bacteria. Monitor your reservoir regularly for other issues like pH fluctuations, nutrient imbalances, and root rot.
How Often Should You Change Your Nutrient Solution?

Changing your nutrient solution regularly is crucial for maintaining optimal plant health. Over time, the nutrient solution becomes depleted of essential nutrients, and waste products from the plants accumulate. This can lead to nutrient deficiencies, pH imbalances, and other problems.
Factors Affecting Nutrient Solution Change Frequency:
-
Plant Type: Fast-growing, heavy-feeding plants like tomatoes and peppers will deplete the nutrient solution more quickly than slow-growing, light-feeding plants like lettuce and herbs.
-
System Size: Smaller reservoirs require more frequent nutrient solution changes than larger reservoirs.
-
Nutrient Concentration: Higher nutrient concentrations can last longer than lower concentrations.
-
Water Quality: The quality of your water can affect how long the nutrient solution lasts. Hard water, for example, can cause mineral buildup and pH fluctuations.
General Guidelines for Nutrient Solution Changes:
-
Every 1-2 Weeks: This is a good general guideline for most hydroponic systems.
-
When the EC/TDS Drops Significantly: EC (electrical conductivity) and TDS (total dissolved solids) are measures of the nutrient concentration in the solution. If the EC/TDS drops significantly, it's a sign that the nutrients are being depleted and it's time for a change.
-
When the pH Becomes Unstable: If you're having trouble maintaining a stable pH, it may be time to change the nutrient solution.
-
When the Solution Becomes Cloudy or Discolored: A cloudy or discolored solution can indicate the presence of algae, bacteria, or other contaminants.
How to Change the Nutrient Solution:
-
Prepare Fresh Solution: Prepare a fresh batch of nutrient solution according to the manufacturer's instructions. Use the same type of nutrients that you were using before, unless you have a specific reason to switch.
-
Drain the Old Solution: Drain the old nutrient solution from the reservoir. Dispose of it properly. Don't pour it down the drain, as it can harm the environment. Instead, use it to water your outdoor plants (if it's relatively clean) or take it to a hazardous waste disposal facility.
-
Clean the Reservoir: Clean the reservoir thoroughly with a mild detergent and water. Rinse well to remove any soap residue.
-
Refill with Fresh Solution: Refill the reservoir with the fresh nutrient solution.
-
Adjust pH: Adjust the pH of the fresh nutrient solution to the optimal range for your plants.
Example Scenario:
You're growing lettuce in a small NFT system. You notice that the lettuce leaves are starting to turn yellow, and the pH of the nutrient solution is constantly drifting upwards. You check the EC and find that it has dropped significantly since you last changed the solution.
It's definitely time for a nutrient solution change! You prepare a fresh batch of nutrient solution, drain the old solution, clean the reservoir, and refill it with the fresh solution. You adjust the pH to the optimal range for lettuce (5.5-6.5). Within a few days, the lettuce plants start to recover and their leaves regain their healthy green color.
Key Takeaway: Change your nutrient solution regularly, typically every 1-2 weeks, or when the EC/TDS drops significantly, the pH becomes unstable, or the solution becomes cloudy or discolored.
Water Quality Considerations for Hydroponics

The quality of your water is a fundamental aspect of hydroponics that significantly impacts plant health and growth. Not all water is created equal, and understanding the properties of your water source is crucial for successful hydroponic gardening.
Why Water Quality Matters:
- Nutrient Availability: Impurities in water, such as high levels of minerals or chlorine, can interfere with nutrient uptake by plants, leading to deficiencies and stunted growth.
- pH Stability: The pH of your water source directly affects the pH of your nutrient solution. Hard water (high in minerals) tends to raise the pH, while soft water may cause it to drift lower.
- Microbial Growth: Contaminated water can introduce harmful bacteria, fungi, and other pathogens into your hydroponic system, increasing the risk of root rot and other diseases.
- System Clogging: Hard water can lead to mineral buildup in your system's tubing, pumps, and emitters, reducing their efficiency and lifespan.
Common Water Quality Issues:
- Hard Water: Hard water contains high levels of calcium and magnesium. While these minerals are essential for plant growth, excessive amounts can interfere with nutrient uptake and cause pH imbalances.
- Soft Water: Soft water has low levels of minerals, which can make it difficult to maintain a stable pH. It may also lack essential micronutrients.
- Chlorine/Chloramine: Municipal water supplies often contain chlorine or chloramine to disinfect the water. These chemicals can be harmful to plants and beneficial microorganisms in your hydroponic system.
- High TDS (Total Dissolved Solids): High TDS indicates a high concentration of dissolved minerals, salts, and other substances in the water. This can interfere with nutrient uptake and cause salt buildup.
- Contaminants: Water can be contaminated with heavy metals, pesticides, herbicides, and other pollutants, which can be toxic to plants and even pose a health risk if you're growing edible crops.
Testing Your Water Quality:
The first step in ensuring good water quality is to test your water source. You can use a variety of methods to test your water, including:
-
Water Testing Kits: These kits are available at most hydroponic supply stores and online. They typically include test strips or reagents that you can use to measure pH, TDS, chlorine, and other parameters.
-
TDS Meters: TDS meters measure the total dissolved solids in the water. They're a simple and affordable way to get a general idea of your water quality.
-
pH Meters: pH meters measure the pH of the water. They're more accurate than pH test strips and are essential for maintaining a stable pH in your nutrient solution.
-
Laboratory Testing: For a more comprehensive analysis of your water quality, you can send a sample to a certified laboratory. They can test for a wide range of contaminants, including heavy metals, pesticides, and bacteria.
Improving Your Water Quality:
If your water quality is less than ideal, there are several things you can do to improve it:
-
Reverse Osmosis (RO) Filtration: RO filters remove virtually all impurities from the water, including minerals, salts, chlorine, and contaminants. RO water is ideal for hydroponics because it provides a clean slate for your nutrient solution.
-
Dechlorination: If your water contains chlorine or chloramine, you can remove it by letting the water sit out in an open container for 24-48 hours. The chlorine will evaporate over time. Alternatively, you can use a dechlorinating filter.
-
Water Softeners: Water softeners remove calcium and magnesium from hard water. However, they typically replace these minerals with sodium, which can be harmful to plants. If you use a water softener, make sure to monitor the sodium levels in your nutrient solution.
-
pH Adjustment: Adjust the pH of your water to the optimal range for your plants before adding nutrients. Use pH up or pH down solutions to raise or lower the pH as needed.
-
Activated Carbon Filtration: Activated carbon filters remove chlorine, chloramine, and other organic contaminants from the water.
Example Scenario:
You're using tap water for your hydroponic system. You test the water and find that it has a high TDS level and contains chlorine. The pH is also higher than the optimal range for your plants.
Here's how you might address the problem:
- Dechlorinate the Water: Let the water sit out for 24 hours to allow the chlorine to evaporate.
- Install an RO Filter: Invest in a reverse osmosis filter to remove the high TDS and other impurities.
- Adjust the pH: After filtering the water, adjust the pH to the optimal range for your plants using pH down solution.
Key Takeaway: Test your water quality regularly and take steps to improve it if necessary. RO filtration is the most effective way to ensure pure water for your hydroponic system.
By understanding and addressing these key aspects of reservoir management, you'll be well on your way to a successful and bountiful hydroponic gardening experience! Remember to always research the specific needs of the plants you're growing and adjust your practices accordingly. Happy growing!
References:
- Hydroponics: https://en.wikipedia.org/wiki/Hydroponics
- Nutrient Film Technique (NFT): https://en.wikipedia.org/wiki/Nutrient_film_technique
- Deep Water Culture (DWC): https://www.growweedeasy.com/deep-water-culture-dwc-hydroponics
- Water Quality in Hydroponics: https://university.upstartfarmers.com/blog/water-quality-hydroponics
- Hydroponic Nutrients: https://www.pthorticulture.com/en/training-center/understanding-hydroponic-nutrients/
- Algae Control in Hydroponics: https://www.maximumyield.com/algae-control-in-hydroponics/2/1790
- Kratky Method: https://homehydro.com/the-kratky-method/